THE ORGONE DONOR
  • Home
  • About
    • Frequently Asked Questions
    • Make a Donation
    • Privacy Policy
  • Geoengineering & EMF
    • Best of Chemtrails
  • Orgone Energy
    • Occupy the Land Project
    • Restore the Desert Project
    • My California Project
    • Downloads, Instructions, and Tutorials
    • The Water Song
  • Blog
  • Orgone Shop

My Blog

Welcome to my blog. I post whenever possible, but for more up-to-date postings, visit my Instagram Page!

Strategically Blocking the Sunset with Geoengineering

4/27/2019

0 Comments

 
Friendly reminder: Even when the sky is crystal clear and a beautiful blue from Orgone energy, there will still be parasites attempting to spray and block the sunset far in the distance whenever possible. Most people don't believe me when I tell them because they assume "well... it's sunny today" so therefore they assume "nothing to see here." It's the same with rain. They spray like mad 23-48 hours before rain, and then it only sprinkles a few minutes, if at all.
And the sheep never paid attention to the fact that it was originally 100 percent chance that dwindled hour by hour until the chemclouds successfully reduced or stopped the chance altogether, resulting in a few sprinkles and nothing more. Then the sheep think "well... It rained," not taking into consideration they just had their rain stolen from them. Then the parasites dump it somewhere it's not needed.

My point is, this video is our new normal. We have gifted so many towerbusters, earth pipes, and other lovely tools that it's become increasingly obvious, and it will become more obvious whenever new places are gifted with Orgone devices. Crystal clear everywhere, except the exact location of where the sun will set. Most days I can actually see the V formations shooting straight up into the sky like missiles (because airplanes totally do that)...

Look for it. Sunrise, sunset, full moons, incoming solar flares, certain astrological and celestial events, symbolic holidays, and even false flags. If you you pay attention you will ALWAYS see increased spray patterns that match these events. This is why geoengineering has more to do with energetic warfare, frequency, vibration, and the collective consciousness, not just some simplistic weapon by military douche canoes.

It's also why we call them parasites!

0 Comments

The Ultimate ChemFAIL

4/7/2019

0 Comments

 
Happy Sunday, and a friendly reminder that chemtrails behave like this when you destroy the parasites' HAARP weapons like cell towers, smart meters, and wifi routers (see video).

Place Orgone devices around your town and surrounding area. Gift your home, cell towers, power plants and substations. Bury earth pipes, create obolixes and pyramids. Build chembusters to amp-up the Orgone energy bubble around your city, and watch this schidt seize, snap, and spiral apart. Why? Because their EMF weapons can't hold and manipulate this crap anymore.

Thank you to the parasite for laying it on thick this morning. You've provided another undeniable example for me to share!


*This message brought to you by the "Seriously, How Can Sheep Not Realize This Isn't Water Vapor, or Even Natural" Foundation.
Picture
0 Comments

Instructions for the Almighty Orgone Chembuster

4/1/2019

0 Comments

 
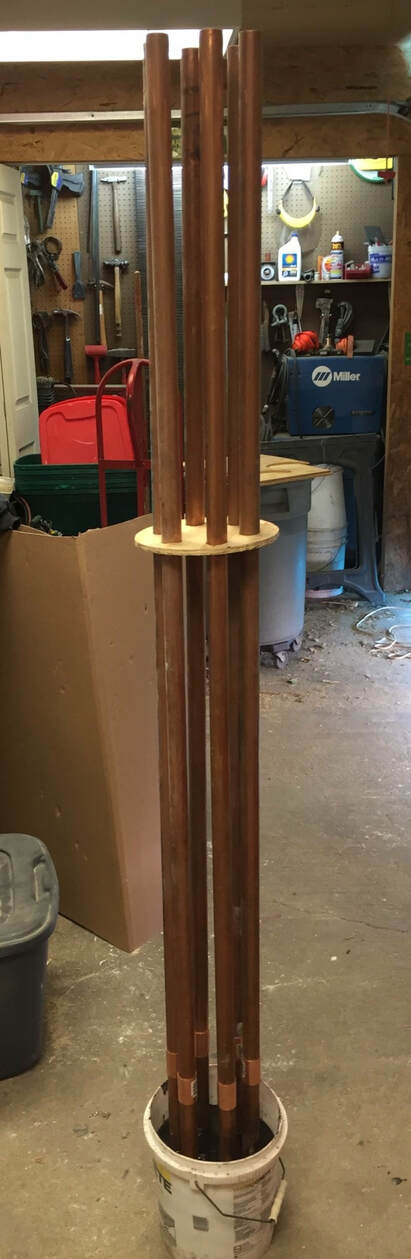
Updated 8/9/19: Downloadable PDFs for instructions on building each of these chembuster models are also available HERE.

The following information is based on my own experience as an Orgone energy researcher and creator of Orgone and scalar energy devices. I've created three variations of the chembuster, the high-powered Orgone device based on the Cloudbuster, which was created by the late Wilhelm Reich. While each of these variations has shown fantastic results, I do have a favorite.

Additionally, if anything I've shared resonates with you and you'd like to support my work, please check out my online shop! All of my gifting adventures and Orgone research for the last few years has been self-funded, and 100 percent of every sale I've made has been used to create and gift more devices throughout the United States (and my happy little pockets of rain forest in Costa Rica).
 
***Disclaimer:
Everything I include in this document is for educational and entertainment purposes only. I am not a doctor, and the information I share regarding Orgone energy is not to be taken as any form of medical advice, nor is it meant to be used to treat or diagnose any medical condition, disease, ailment, or other heath-related issue known to exist in the entire universe. If you understand how and why Wilhelm Reich was destroyed by the FDA, this disclaimer will suffice. If you still have questions about this disclaimer, then Chembuster building is not for you. Please find a new hobby.
 
Additionally, I do not create or manufacture Orgonite devices for sale. I create orgone and scalar energy devices. The term Orgonite was recently trademarked by someone who I believe is a government shill. For details about that parasitic nonsense, visit my Orgone Energy page. For questions about Chembuster building, email me at [email protected]. I'm always happy to help others combat this nonsense, especially those people taking action to help themselves!

In order below, you will find the outlines for the Don Croft CB, the Induction CB, and my personal new toy, which I didn't know what to call it other than Mitch's CB. Enjoy!

The Original Don Croft Chembuster
 
What is it?
The Don Croft Chembuster is the original sky-cleaning tool for Orgone workers. It is essentially a large bucket filled with an orgone device recipe of metal shavings and resin, typically aluminum shavings so it’s light-weight (it can also include other metals like brass and iron). Six copper pipes are embedded into the device standing up, fastened together with a thin piece of wood with six 1-inch holes drilled through it.

Six quartz points are embedded inside the copper pipes, meaning that one quartz point is placed in the bottom of each copper pipe, and each pipe is then sealed with a copper cap before placing the capped end of each pipe inside the resin/metal mix within the bucket. This ensures that the resin/metal mix does not actually come into contact with the quartz crystals inside each copper pipe.

The original instructions around the Orgone interwebs also include small rings of garden hose to fit over the quartz crystals, with the claim this gives enough pressure to squeeze the quartz for the piezoelectric effect since it is not being squeezed by the compression of resin after it catalyzes and hardens. I only did this step while constructing the first chembuster I ever made; and while the CB worked wonders, I made follow-up models where I left the caps off the pipe and kept the quartz points exposed, simply placing them in the bottom of the pipes. Then the resin filled the pipes and surrounded each quartz point in each pipe, ultimately exerting some light pressure on the quartz inside the pipes. I know there are some Orgone workers who would have a hissy-fit knowing I did this. I don't care. Our meteorologists in Chicago spent months running around like chickens with their heads cut off because the weather wouldn't do what their geoengineering handlers at Raytheon and Weather Central wanted, and their scripts were made useless. Side note: If you want a good laugh on this topic, check out my YouTube channel and watch any of my Fear Porn Forecast videos. My point is, this construction method has worked for me well enough to continue building them that way; however, if you're making this version for this first time, I recommend just following Don Croft's original instructions and avoiding modifications.

This is also most expensive variation of chembusters I’ve created, due to the copper pipes, couplers, and end caps, but it is a tried-and-true device used for years by Orgone workers around the world with success at restoring the natural weather cycle. If in doubt, make this one. It’s fantastic.
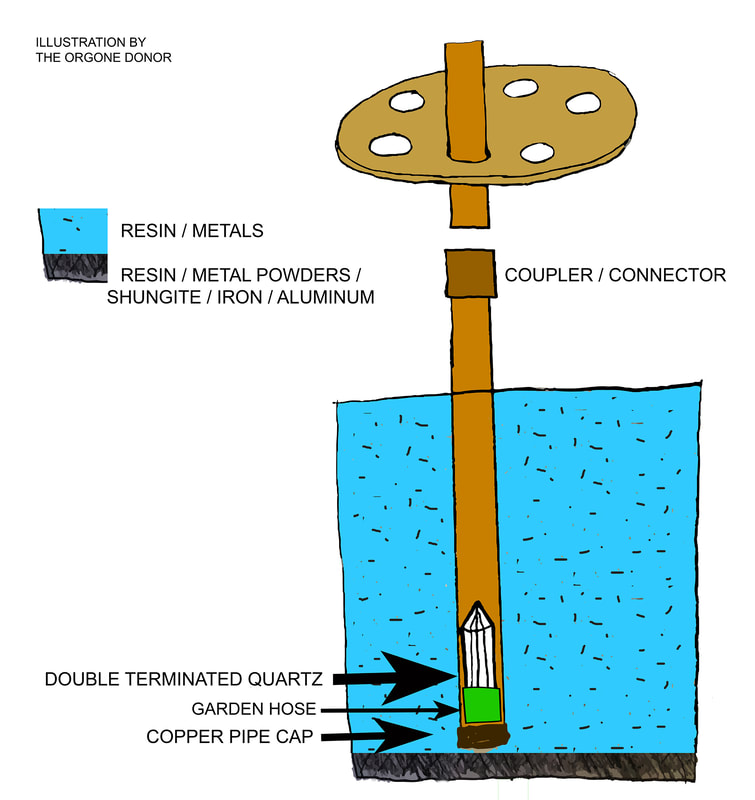
Picture
Supplies Needed:
  • Two gallons of resin (If on a budget, use something simple like Bondo Fiberglass Resin from the hardware store)
  • One 2-gallon plastic white bucket (also from the hardware store).
  • Six 1-inch copper pipes with dimensions of 1 inch diameter by 72 inches (so basically, each pipe is six feet long) - I use Type M or L (mostly M due to cost)
  • Six double-terminated quartz crystals (double terminated means they're pointed on both ends), and they must be able to fit inside each of the copper pipes.
  • Glue or caulking agent (for fastening the quartz points inside each pipe and gluing each cap shut)
  • Garden hose, cut into six pieces, long enough to cover half of each quartz point
  • One round CB disc, which is the wooden or plastic disc with six holes that will be used to support the pipes during construction. The disc will also continue adding support after the device is complete. Each hole should be the same diameter as the outer diameter of each copper pipe
  • Copper pipe caps, 1 inch diameter (found at hardware stores) These will be glued shut on the end of each pipe
  • Six copper couplers, for 1-inch copper pipes (these are the small connectors for pipes)
  • Crushed quartz, selenite, Shungite, tourmaline, and/or other crystals (all of these are optional)
  • Shungite Powder (three to six ounces by volume, also this is optional)
 
Tip for Building:
Purchase pipes in 10-foot increments. Also purchase a $5 pipe cutter. Cut one of the pipes into ten pieces, each the length of 1-foot. Also, purchase three more 10-foot pipes and cut them into 5-feet increments, so you have six pipes at 5-feet each, and then use six of the ten 1-foot pipes as well. You can use the extra four 1-foot pipes as earth pipes later on. This is how you make the CB base with only 1-foot of pipe, which makes it mobile, then attach the 5-foot pipe to the base.

Wooden Discs
Some people have asked me where I get my discs. I purchased one back in the day from Orgonise Africa and then continued using it as a template with my uncle's drill press. I've also seen printable templates online. This seems to be the piece that most people can't create themselves due to not owning the tools (jigsaw for carving the circular shape, drill press for punching out the holes). Don't be discouraged by it. Use your best judgment to obtain, purchase, or make these discs. In my case, I now create my own using the same disc I bought from OA. The disc doesn't have to be perfectly round, or even round at all (if you don't have a proper saw). Just make sure the holes are the same diameter as the pipes you're using. Copper is heavy, so you need at least one disc to help support this device in the construction process. Croft's original instructions called for two. One is essentially buried within the bucket of resin. I manage to pull the disc up after the resin has cured so my pipes are straight and then I only need one disc at the top with the extending pipes that are connected later.
 
Shungite FYI: I use Shungite powder (optional). Shungite powder is a strong antioxidant that purifies everything it touches. Resin is activated by oxygen and heat. Because of this, Shungite will actually slow the curing process significantly. It takes a little practice, but whenever I add Shungite powder to resin I add some extra catalyst/hardener in order for the resin to properly cure. My process for this is:
  • Add the amount of catalyst per the instructions. Mix as required
  • Add Shungite powder, stir
  • Then add an additional 50-75 percent of the original amount of catalyst indicated in the resin instructions.
Example: One of my resins calls for 10-drops of catalyst per 1-ounce of resin. So one ounce of resin will have 10 drops of catalyst, then I mix my Shungite powder, then I add an additional five to seven drops of catalyst after adding the Shungite.
Picture
Picture
Construction:
  1. The method is fairly simple. Slide the hose over each quartz point so it's tightly fit.
  2. Using some silicone glue, add a dab to the copper caps, and then stick the terminated crystals on each of the caps. You want to make sure the quartz crystal sticks to the cap, and that the cap will fit on the end of each 1-foot pipe that you previously cut out.
  3. Slide each 1-foor pipe with the hose-covered quartz into the wooden disc to make sure all six pipes are stable and standing as straight as possible.
  4. Begin preparing your a quart of resin (I do this in 1-quart increments).
  5. Depending on how large your metal shavings are, some people find it easier to fill the bucket with shavings and then pour the prepared resin over the top so it fills in the gaps and sinks to the bottom. If the shavings are too small, then you can mix them in a container with the resin first so that it forms a thick consistency (I call this the milkshake method). It will be very thick like a milkshake, but should still be pourable, and then you can pour the entire mixture into the bucket.
  6. Fill the bucket at least one to two inches of prepared resin/metal mix (and powders and shungite if using them) before doing anything further with the pipes and wooden disc.
  7. Once the first layer is heating and hardening inside the bucket, prepare your 1-foot copper pipes by setting them inside the bucket so the entire pipe structure is sitting on top the first layer of cured resin. The wooden disc should remain at the top, just outside the bucket. It is only meant to keep the pipes situated and aligned until later. Some people use several discs and bury one within the bucket on the bottom. I don't find this necessary in my experience but others do. Use your best judgment
  8. Prepare another quart of resin and metals and pour this into the bucket so that it begins to cover the pipes. Let this layer begin to harden
  9. Continue repeating the resin/metal mixture in quart increments for each layer. Make sure to wait until the previous layer begins hardening and getting warm
  10. Make sure to stop filling the bucket with your resin/metal mixture at least onc inch before you reach the top of the bucket
  11. Once the chembusters bucket base has cooled (this takes about 3-4 hours), you can slide the wooden disc off of the pipes
  12. Use the copper couplers to connect a 5-foot pipe to each of the pipes sticking out of the chembusters bucket base
  13. Reattach the wooden disc to each 5-foot copper pipe so the disc is at the top of the entire device. This will hold the pipes in place and give extra structure
  14. Wait 2-3 days before expecting dramatic results. You’ll most likely experience windy conditions, a possible black helicopter experience (seriously, look it up, also don't worry about it... it's just psychological nonsense from loser parasites). You should also see noticeable geoengineering activity breaking down; but the full effects may take a few days as the new CB calibrates to the environment

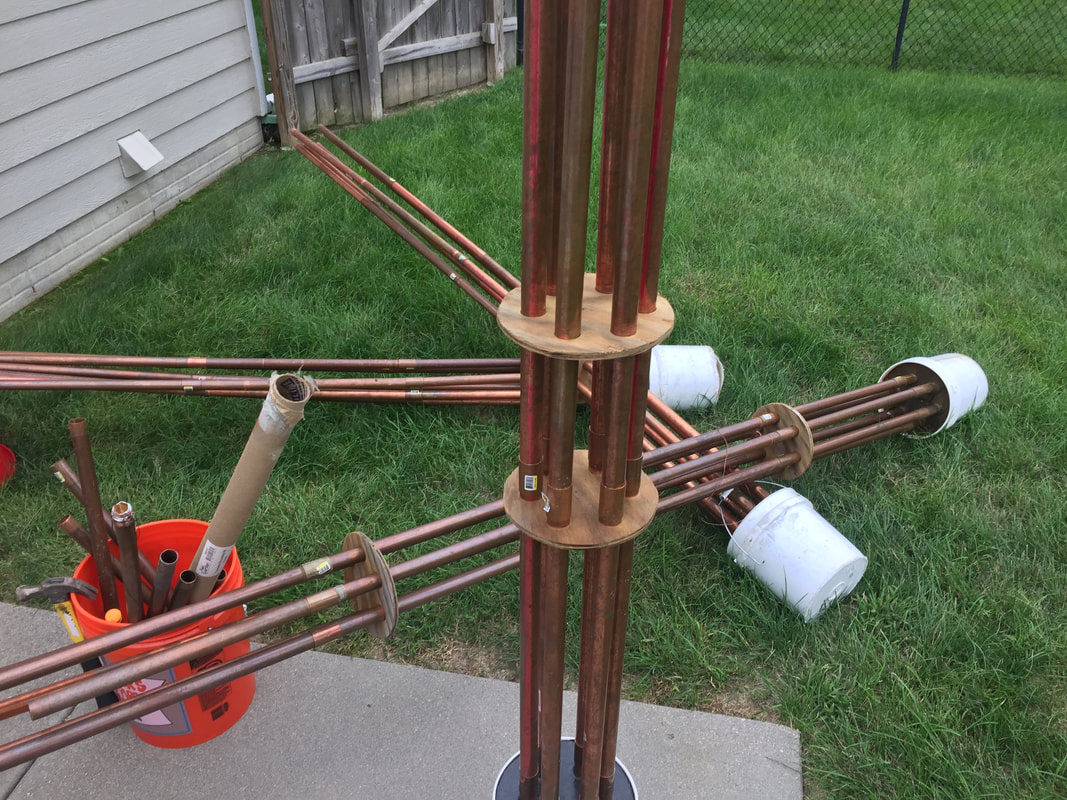
As you become more familiar with chembusters, you can also begin to add more pipes and disc supporters to make the device taller. In my experience, longer copper pipes showed enhanced results.
Picture
Picture

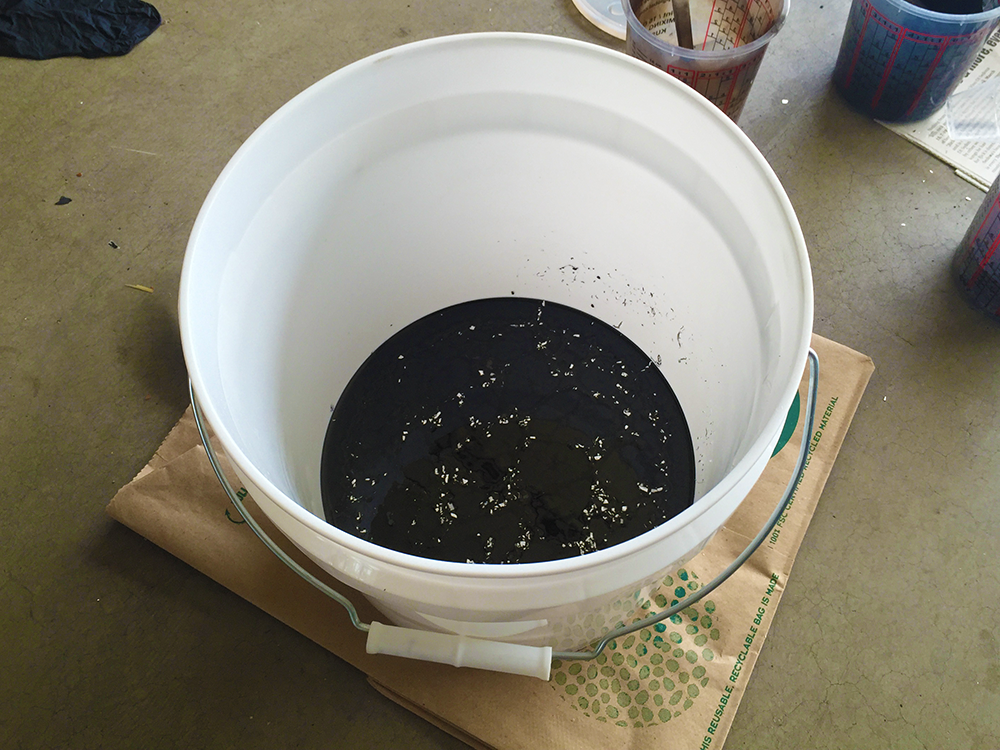
The Induction Chembuster
 
What is it?
The Induction CB is a powerful device for those who want to create a significant impact against the geoengineering agenda but are restricted due to their budget. There are many Orgone workers around the world who claim this device is just as powerful as the Don Croft CB, and I believe many of the claims myself. I have made one of these and the results were spectacular. I’ve researched as much as I could about the Induction CB, and the only available sources I can find mention it was developed by Virgil Grenier. I can’t verify with certainty if this is true.
 
The cost to produce my Induction CB was nearly half of the cost of my previous Croft CBs. The three main differences between these devices are that 1) the Induction CB utilizes aluminum tubes instead of copper pipes; 2) there are no terminated crystals inside the pipes. Instead, the pipes are left empty and embedded into the bucket of the resin/metal mixture, and a large amount of crystals are added to the overall mixture in no particular way. The crystal mixture can be any crushed or terminated quartz crystals that you want to use; and 3) the Induction CB can be modified to a smaller size than the regular Croft CB. Some people make Induction CBs that are much smaller in the base, using a smaller bucket/mold. The Induction CB is essentially a bucket of towerbuster with aluminum pipes sticking out, kind of like antenna for the giant towerbuster that it is.
 
The aluminum pipes are also insulated from the resin/metal base by wrapping them in an insulating tape or other type of wrapping, so that the mixture does not have direct contact with any of the aluminum pipes that have been embedded inside the mixture. The supplies needed are based on my own creation, so I used the same 2-gallon bucket as my base mold.
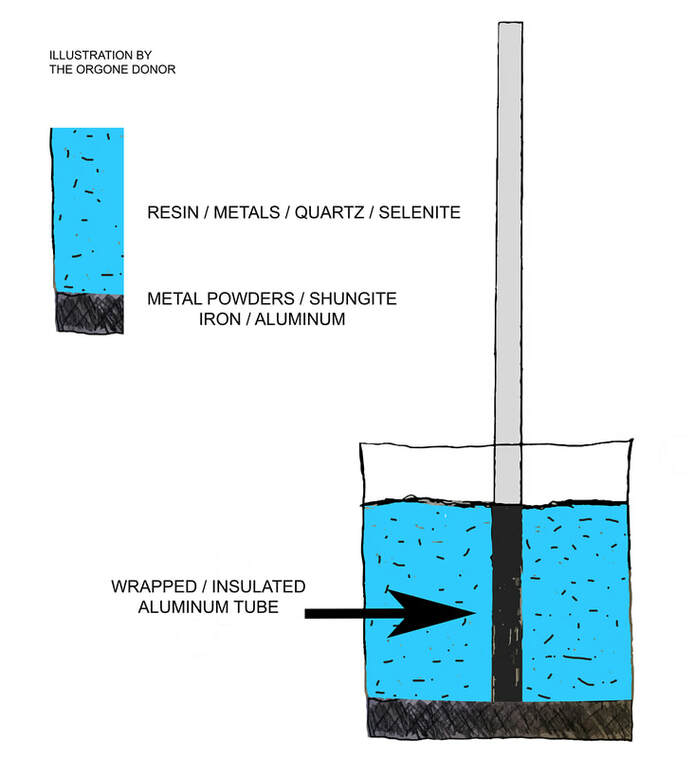
Picture
Supplies Needed:
  • Two gallons of resin
  • One 2-gallon plastic white bucket
  • Six 1-inch diameter aluminum tubes (these usually come in 8-foot tubes)
  • One round CB disc,  the wooden or plastic disc with six holes that will be used to support the pipes during construction and continue adding support after the device is complete. Each hole should be the same diameter as the outer diameter of each copper tube.
  • Eight ounces (or more) of Quartz and selenite, by weight (pieces, points, small chunks, powders, crushed, etc… doesn’t matter)
  • Three to six ounces of Shungite powder, by volume (this is optional, but I believe shungite enhances this particular model)
 
Tips for Building:
If you have access to the wooden/plastic discs that hold CB pipes in place, you will notice that 1-inch aluminum tubes are not the exact same diameter as 1-inch copper pipes. However, 1-inch aluminum tubes should fit inside Type M 1-inch copper pipes. I use a pipe cutter and cut a small ring of copper from my Type M pipes used for other CBs and earth pipes, and then slide it over the aluminum pipe and fasten with tape. The aluminum fits through the copper, and the copper fits snug into the wooden disc, so the disc will then support each of the aluminum tubes and keep them in place during construction.
 
If you have the correct drill bits you can also just cut discs that fit directly with your aluminum tubes.
 
Purchase aluminum tubes in 8-foot increments. Also purchase a $5 pipe cutter. Cut each pipe into 6-foot length. You can use the remaining 2-foot increments of aluminum tube for earth pipes. Or if you prefer, you can leave the tubes in 8-foot lengths and build a taller CB. Please note, because there are no connectors (couplers) with this device allowing you to take it apart, this device is less mobile due to the final shape when it’s standing up. It is essentially a 6-8 foot device and the tubes do not disconnect from the base like in the Croft CB.
 
Shungite FYI: I use Shungite powder (optional).
Shungite powder is a strong antioxidant that purifies everything it touches. Resin is activated by oxygen and heat. Because of this, Shungite will actually slow the curing process significantly. It takes a little practice, but whenever I add Shungite powder to resin I add some extra catalyst/hardener in order for the resin to properly cure. My process for this is:
  • Add the amount of catalyst per the instructions. Mix as required
  • Add Shungite powder, stir
  • Then add an additional 50-75 percent of the original amount of catalyst indicated in the resin instructions.
 
Construction:
  1. Prepare your aluminum tubes by wrapping one end of each aluminum tube with an insulating tape, at least as long as the depth of the resin/metal mixture that will fill the bucket. This will prevent any of the mixture from coming in to contact with the aluminum tubes.
  2. In quart increments, create your resin/metal shavings mixture, and make a layer in the bottom of the bucket, about 1-2 inches deep. Then let it begin to cure
  3. Place the tubes in formation with the wooden disc support so they are in place and standing up. Make sure any aluminum tubing inside the bucket is covered with the insulting tape
  4. Continue mixing your base of resin and metals, and drop the crystals into the mix so they are submerged. You don’t need to add everything at once. Add some crystals during each of your layer pouring. While this device isn't really "layers," it will be poured in layers to avoid mixing too much resin at one time. Essentially this will become one block of an Orgone device within the bucket.
  5. Fill the bucket about 1-inch from the top. Make sure all of your remaining crystals are inside the bucket mixture. The crystals should be distributed throughout the entire resin/metal mixture. Let the entire device cure for several hours before moving.
  6. Wait a few days for the fun to start happening (Although it will happen much sooner than that)!

Mitch’s Chembuster

What is it?
This is my favorite CB to make because in my experience it is the most powerful CB I’ve created. The construction is similar to the Induction CB, however, the aluminum tubes are not insulated from the resin/metal/crystal mixture, and the device is prepared in layers instead of one giant "base" of the same material. The design is based on a smaller-scale device I created in January, 2019 that I named “The ORgun.” Please see my blog post at TheOrgoneDonor.com/blog to learn more about my ORgun device.
 
My CB is constructed in several layers with crystals scattered throughout the base. I also amplify the energy by utilizing 18 quarts points wrapped in copper coils which are placed in groups of six per every other layer. This device has six layers, so three of them will each have six of the wrapped quartz, facing outward from the center of the base. Other crystals like selenite can be added to any of the layers. I add selenite to all of the layers. In addition to the wrapped points and the other crystals used in the resin and metal mixture, I embed a 15 Hz Succor Punch device in the top of the CB base once all of the other layers have been prepared. The SP uses a 9V battery to pulse the 15 Hz frequency. Quartz points are not necessary within the aluminum tubes.
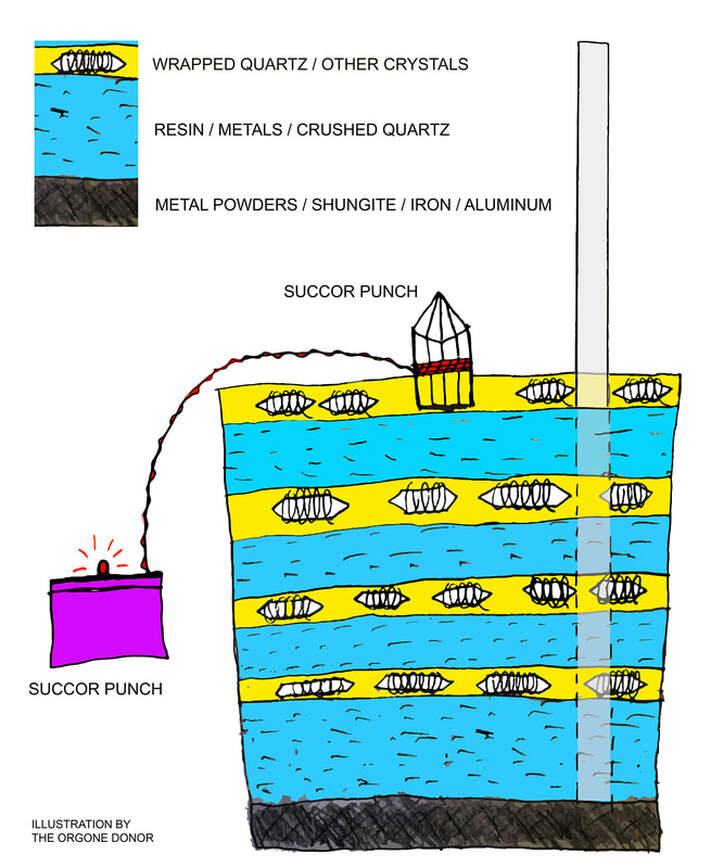
Picture
Supplies Needed:
  • Two gallons of resin
  • One 2-gallon plastic white bucket (from any hardware store).
  • Six 1-inch diameter aluminum tubes of at least six-feet in length (these usually come in 8-foot length)
  • 16 ounces of metal powder (by volume). This can be steel, copper, brass, iron oxide, or aluminum
  • Eight ounces of iron shavings (this can be substituted with additional aluminum shavings if you can’t find iron). The iron will add extra weight in the bottom layer and allow the CB to stand up without additional support
  • One round CB disc. This is the wooden or plastic disc with six holes that will be used to support the pipes during construction and continue adding support after the device is complete. Each hole should be the same diameter as the outer diameter of each copper pipe.
  • 18 Quartz with points (terminated) approximately 2-3 inches, each wrapped in a copper coil (I use 18-20 gauge copper wire to wrap my quartz points)
  • One Succor Punch 15 Hz Pulsing Device -- I purchase my SPs from CTBusters.com (make sure to order one with a lead wire between the quartz and the battery, not the one with the quartz glued to the box. Those types are better for carrying as a cloaking device when gifting orgone devices).
  • Eight ounces of random Quartz and selenite (again, this can be pieces, points, small chunks, powders, crushed, etc… doesn’t matter.
  • Six magnetic hematite spheres (optional)
  • Three to six ounces of Shungite powder (by volume, and optional, but I recommend adding this)
 
Tip for Building:
This particular device is prepared in layers. The first layer includes resin, metal powders, iron shavings, Shungite powder, and some crushed quartz and selenite, so it’s basically a large towerbuster. The following layers alternate between one layer of aluminum shavings and resin with a little bit of crushed crystals added, followed by a thin layer of resin with six wrapped quartz points. The layers with the wrapped quartz only need to be about 0.25 to 0.5 inches thick, just enough to cover the wrapped quartz points. Then layer another resin/aluminum/crushed crystal layer, then another thin layer of resin and the wrapped quartz. In the end, there should be three layers with six wrapped quartz per layer, and then three layers of resin/metals/crushed crystals
 
When ready, insert the succor punch device into the top of the CB base, use strong tape and stick the SP battery box to the side of the bucket. Do not let the battery box fall into the resin mixture.
 
Please Note: My latest device includes an additional layer on top with more wrapped quartz for a total of 24. The recipe for this only uses 18 quartz points. The extra quartz in my device was included for aesthetics because the top is clear. It is completely optional.  I also used copper shavings throughout the process, including the top, but this is not necessary. Use the metal shavings you can get. Copper shavings can be very expensive.

Shungite FYI: I use Shungite powder (optional). See my disclaimer about making sure to use enough extra catalyst when Shungite is added to the mixture with resin (I posted this in the previous two models).
 
Construction:
  1. Prepare your aluminum tubes so they are secured with the wooden/plastic disc. This will make it easier to set when you finish the first layer
  2. Prepare 32 ounces of resin and mix with the Shungite powder, metal powders, and then slowly add the iron shavings (you might not use all of the iron depending how thick the mixture becomes). Again, you can use aluminum in this layer if you don’t have iron. The iron gives the base a sturdier weight for support. The entire mixture should be a thick milkshake consistency
  3. Once the first layer begins to heat up and/or begins to harden, place the aluminum tubes inside the device so they are level and stand up freely within the bucket.
  4. Prepare 32 ounces of resin (approximately) and mix with aluminum shavings and some crushed crystals. It should be a thick milkshake consistency. Pour into the base so it begins to cover the aluminum tubes and let it begin to harden or heat up
  5. Mix 16 ounces of resin and pour over the previous layer. Then place six of the wrapped quartz points inside the base, each facing outward. One quartz point should fit within the gap between each of the aluminum tubes. At this point you can add other crystals as well.
  6. Repeat this layer process so that you have the following setup from bottom to top:
  • Resin/Shungite/iron base (then wait until it begins to harden and setup the aluminum tubes)
  • Resin/aluminum, crushed crystals
  • Resin/wrapped quartz
  • Resin/aluminum/crushed crystals
  • Resin/wrapped quartz (this is where I also added the optional magnetic hematite spheres)
  • Resin/aluminum/crushed crystals
  • The top layer that comes next will be the layer with the embedded succor punch in the middle of the device, facing upward. There is no particular way to do this. Just prepare your resin and then wait a few minutes so that it thickens before pouring. Then pour, and insert the succor punch. You will have to hold the SP in place, so if you have a space heater or small heat gun, it might be useful to use it in order to speed up the process for the top layer (although not required). Resin will generally solidify before getting “hot” so just be patient and the SP should stay in place shortly after you embed it. Make sure to embed the SP crystal at least half way into the layer, and let the wires remain fairly loose as they stick out of the resin.

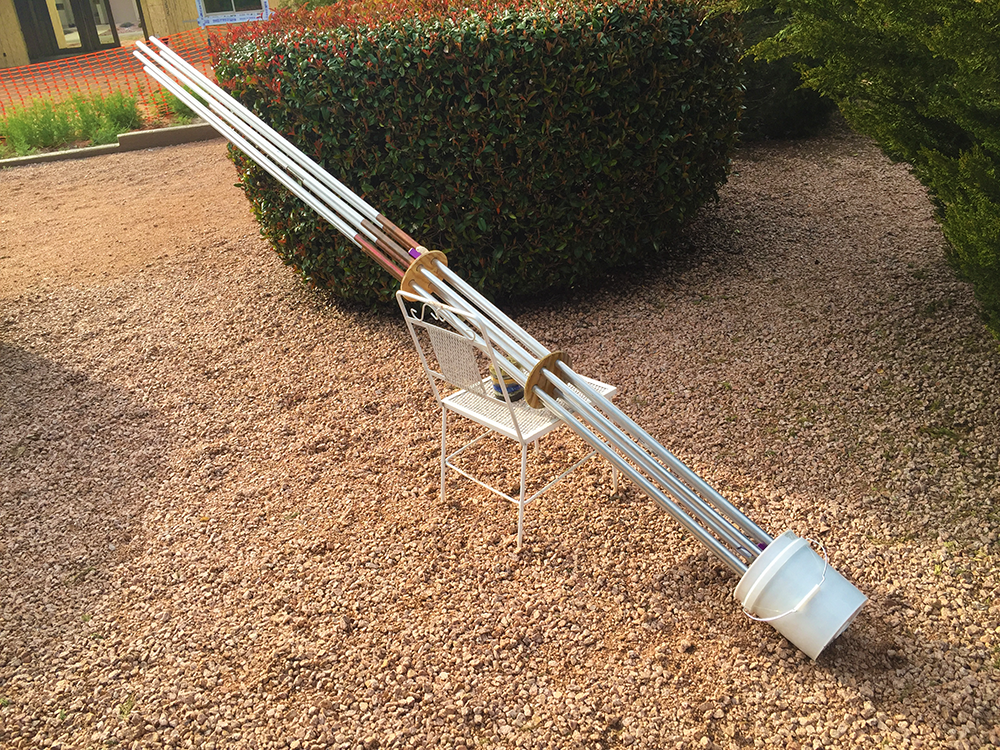
***Make sure to use tape (duct or stronger) to hold the battery pack of the SP in place while the resin is curing and begins holding the SP crystal in place. When I made this top layer, I prepared my resin and then waited three to five minutes to pour it into the bucket. This way it already began to thicken so I didn’t need to hold the SP crystal in place for very long before the resin hardened enough to hold it up by itself.
 
Allow the full device to cure/harden for a few hours before moving it, then you’re good to go kick some parasite ass. Slap a 9 volt battery into the SP battery pack and enjoy!

Also, this device is approximately six feet tall. For my own device, I cut six pieces of 1-inch Type-M copper pipe, approximately six inches in length. Type-M 1-inch copper pipe is just slightly larger in diameter than 1-inch aluminum tubing. I used the copper pieces as connectors and added an additional 6-foot aluminum tube to each of the existing tubes on the device, making my CB just shy of 13 feet tall. In my experience, this is not necessary for the piece to function, but it makes for a fun time aiming at chemtrails and causing the parasites to work overtime as their chemtrail sprays disintegrate in an instant! If you're building your first CB,  I don't recommend making too many modifications. Keep it simple!

For more info on this CB please email me at [email protected].
Picture
Picture
Picture
Picture
Picture
0 Comments

    RSS Feed

    Archives

    January 2025
    December 2024
    November 2024
    October 2024
    July 2024
    June 2024
    April 2024
    March 2024
    February 2024
    January 2024
    November 2023
    September 2023
    July 2023
    January 2023
    November 2022
    October 2022
    September 2022
    August 2022
    July 2022
    May 2022
    March 2022
    December 2021
    October 2021
    September 2021
    July 2021
    June 2021
    May 2021
    April 2021
    March 2021
    February 2021
    January 2021
    October 2020
    June 2020
    May 2020
    March 2020
    January 2020
    December 2019
    November 2019
    October 2019
    September 2019
    August 2019
    July 2019
    June 2019
    May 2019
    April 2019
    March 2019
    February 2019
    January 2019
    December 2018
    July 2018
    June 2018
    May 2018
    April 2018

Picture


EMAIL

[email protected]

Privacy Policy for Website
    Please do not leave comments or demands that say "call me," or assume I will call you simply because you demanded it. This happens a LOT, from complete strangers, and it's insanely presumptuous and rude. Provide some details and context in your written comments or questions. If you can't be bothered to invest your own time in seeking knowledge or finding answers to sit down and compose your thoughts, yet you expect me to just drop everything and give up my own time and schedule to provide you with a crash course and a phone chat where you plan to spout-off 50 essay questions for me or tell me your life story that I don't have time for, then let me kindly burst your narcissist bubble and say I'm sorry, but I can't help you.
    Please read my Frequently Asked Questions Page prior to reaching out with questions. If you're writing a novel, please don't. I don't have time to read life stories or essays. Time is money. Life is short. Get to the point.

    Also, emails asking for free stuff are ignored. I only put that option in the list to weed our rude people. It's time that humanity put up or shut up. If you can't invest anything from your own life into helping the cause, then you were never supportive of the cause in the first place and I can't help you.

    Lastly, please don't tell me you're broke or share details about your financial situation. It's rude, and you're trying to gaslight me. The resources to make Orgone devices are becoming astronomically expensive. Mentioning your money situation makes me think you're trying to guilt trip me into giving away some free shit. Don't do it.

    Thank you for only sending thoughtful, informative, and productive questions and messages.

    ***Excessive spelling/grammatical errors will make me think you're an AI bot. Just letting you know; it deceases the likelihood of a response to your message.***
Send Message
-------------------------------------------------------
By clicking the Send Message button you agree to contact me only with honest intentions involving the absolute truth, and confirm you are not a government agent, parasitic entity, AI Borg or demonic robot, nor are you affiliated with any government or parasitic entity. You also confirm you have only the most positive intentions based on the absolute truth for all of humanity, Mother Nature and the Universe.

© Copyright 2024 - The Orgone Donor - All Rights Reserved
​Website Design by: Sparkly Results
  • Home
  • About
    • Frequently Asked Questions
    • Make a Donation
    • Privacy Policy
  • Geoengineering & EMF
    • Best of Chemtrails
  • Orgone Energy
    • Occupy the Land Project
    • Restore the Desert Project
    • My California Project
    • Downloads, Instructions, and Tutorials
    • The Water Song
  • Blog
  • Orgone Shop